While we wait for a full teardown by 52Audio, we can have a gander of the inside of the new WH-1000XM5 thanks to the FCC. There some new details that are revealed by the FCC, like the battery capacity, more ribbon cable use, and an unknown ring structure on the left side.
We can start off with the left side.
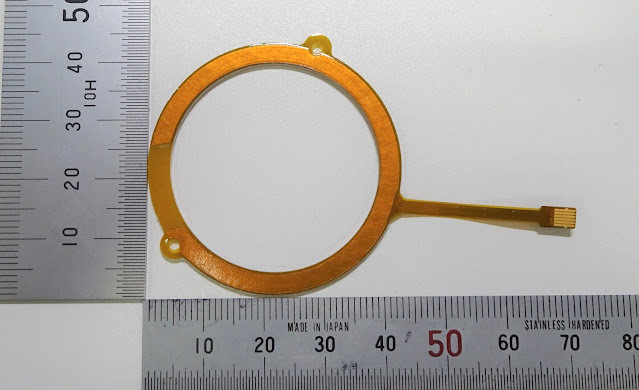
Looking at the new 30mm driver, we can see the feedback microphone cover and a ribbon cable, previously the WH-1000XM4 used regular wires. We can also see a mysterious ring around the driver unit. I noticed this ring first in the WH-1000XM5 engineer interview (photo below), but did not put much thought into it. This ring is labelled as 'WPAD' in the FCC documents. At first I thought this was a wireless charging coil but looking closer at the ring, the metal printed on the ring does not go all the way around and it looks more like some sensor. Recall previously on the WH-1000XM4, the right side had the optical proximity sensor, which is absent in the new model.
Here are the two images of the 'WPAD' from the FCC filling.
 |
| Click for larger size |
 |
| Click for larger size |
The underside of the ring has some kind of metal contact with a gap. Perhaps this is some sensor for the proximity? Or could it be related to the noise cancellation (Auto NC optimizer)? If anyone has any clues what this is, please leave it in the comments.
Edit: This is the wear detection sensor, now electrostatic rather than optical like the WH-1000XM4. Thanks to mirai160525 from twitter for the information.
Looking at left PCB next, we can see some ribbon cables, and the microphones around the edge. The ribbon cables going through special outlets in the plastic, similar to the WH-1000XM4. I did notice the hinge is now inside the headphones and not on the outside as before. Perhaps this is meant to minimize noise and sound of the hinge?
Looking inside, we have 4 ribbon cables, 1 at the top, and 3 on the bottom. I think the top cables go to the 'WPAD' ring structure, the bottom right white cable connects to the headphone jack/button PCB, the bottom middle cable is from the feedback microphone, and the bottom left is from the left microphone array. This array can be seen below, notice 4 microphones.
 |
| Left microphone array (click for larger size) |
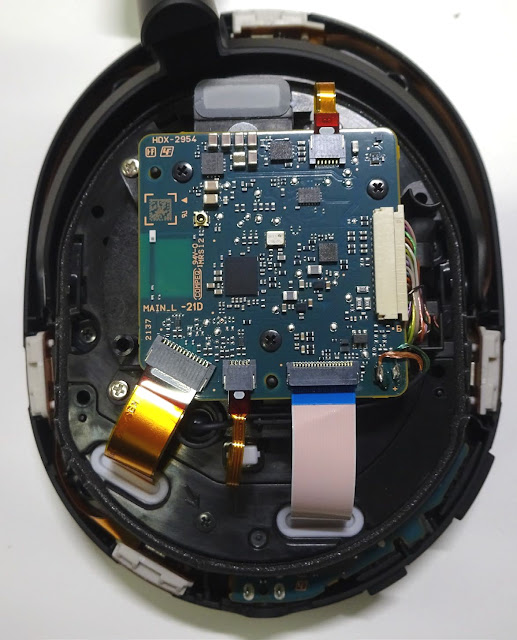
Now to the PCB itself without any connections. I will try to identify certain parts, but some due to the resolution cannot be identified.
1. Sony QN1 (CXD90050)
2. Connector for left microphone array
3. Connector for feedback microphone ribbon cable
4. Connector for the headphone jack/button PCB
5. Left driver contact points
6. Connector for cables from right side
7. Connector for the 'WAPD' ribbon cable
8. Wireless Bluetooth Antenna
9. Crystal oscillator
I compared the PCB size between the WH-1000XM5 and WH-1000XM4, and the new model has a slightly larger PCB, possibly to accommodate the extra ribbon cable connectors.
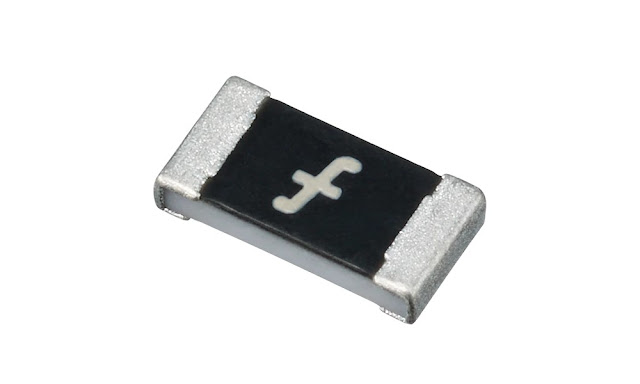
In the WH-1000XM5 engineer interview, Sony mentioned the use of "high-quality sound resistors", so I wanted to see if I could find them. The photo below is from the WM1ZM2 product page, showing this type of sound resistor.
Of course the photos from the FCC teardown are rather poor, but I can make out 2 of these resistors on the PCB board, beside the yellow arrows. I will point out the WH-1000XM4 had similar resistors but it looks like those had O written on them, not f. Perhaps those are different, or perhaps the exact same thing.
On the other side of the PCB, we have a more chips, like the Bluetooth SoC and some unknown chips. The Bluetooth chip is the MT2822A. While the photo does not show the writing on the chip, the manual does reveal the chip.
Nota: Información de dispositivo(s) para
funcionalidades inalámbricas:
Modelo: MT2822A, Marca: Media Tek
1. Mediatek MT2822A (Bluetooth SoC)
2. J8 tantalum capacitor
3. Air pressure sensor
4. Unknown chip 1
5. Unknown chip 2
The unknown chips could be an external memory chip and a Cirrus Logic chip for always on voice. A full teardown will reveal these chips, so we have to wait for that.
The left side also has the headphone jack and button PCB. Not much here apart from the 3.5mm jack, ribbon cable connector, and what look to be 2 small LEDs which indicate the connection status.
In the WH-1000XM4, the setup was a bit different, the 3.5mm jack was on its own board, and the buttons where on a ribbon cable and of different design (see below).
 |
| Sony WH-1000XM4 button PCB - source: 52Audio.com |
The WH-XB910N has also moved to a similar design of integrating the buttons and 3.5mm jack onto one PCB board. The XB910N goes a step further and also has the USB type-C on the same board.
One would think a PCB could be slightly heavier and bulkier than the WH-1000XM4 setup, but an entire PCB slots into place easier and is sturdier and does not require extra plastic to hold it in place, unlike the ribbon cable setup above.
Moving onto the right side, we can see the driver, but no additional ring around the driver. The only other item is the feedback microphone and its ribbon cable. Interesting, the plastic around the driver is transparent, identical to the engineer interview, and different to the product video which showed black plastic.
The smaller driver size is more evident here without the ring on top and seems rather dare I say too small for such a pair of headphones. But Sony did say the new material for the diaphragm works best in this smaller 30mm size. That is until they release another premium device with larger drivers in the future. I wonder if the new gaming headsets will get drivers with the new diaphragms?
Opening up the right side reveals the battery and touch sensor.
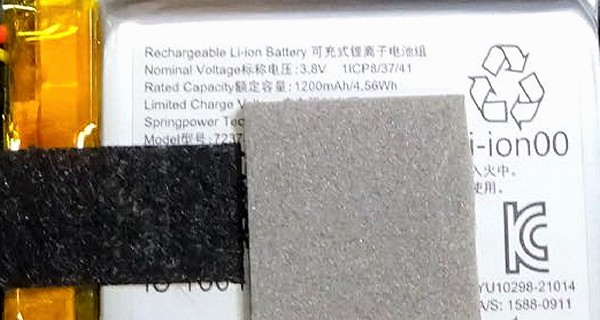
The packaging seems a bit tight, but that might be because of the hinge moving into the earcups. Zooming in on the battery, we are looking at 3.8V, rated at 1200mAh/4.56Wh. The manufacturer is Springpower, which also makes the battery for the WH-XB910N and WF-1000XM4 charging case. Unfortunately we do not have the full model number, since it is partially covered up by the battery temperature sensor.
I tried searching for a 1200mAh 3.8V Li-ion battery on various sites and marketplaces, but found nothing. We will have to wait for full teardown to know the full battery model number.
Anyways, the previous model used a 3,7 1100mAh/4.1Wh battery. A direct comparison is not that simple since the new model uses 3.8V versus 3.7V in the old model, so maybe a Wh comparison is more appropriate? If so, then the new model has a higher capacity, but it does not last that much longer. This could be because the headphones are using more power since there are more microphones and now the Bluetooth chip is also performing noise cancellation.
Here we can see the touchpad sensor.
The WH-1000XM4 used a PCB for the sensor, with Sony moving to a ribbon cable like material for the new model. This is probably one of the weight saving techniques Sony mentioned.
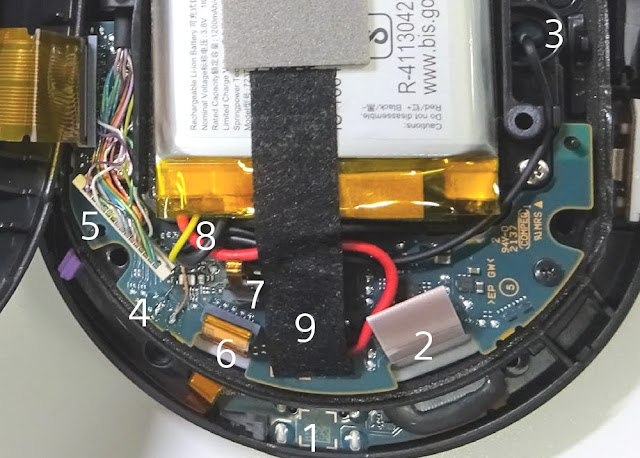
Looking closer at the connections and cables:
1. USB type-C PCB
2. Ribbon cable connecting accessory board to USB PCB
3. Driver cable exit
4. Driver wire connections
5. Connector with cables running to left side
6. Microphone array right side
7. Feedback microphone connector or battery temperature connection
8. Battery cables
9. Battery connection to board (under the tape)
I am still not sure where the battery temperature sensor attaches to, either it attaches at the same place as the battery connection (#9), or is connected at #7. For now a mystery, we will know once we see the full teardown. Below is the microphone array from the right side, notice 3 microphones, for a total of 7 so far.
| Right microphone array (click for larger size) |
For those curious how the right side PCB looks without the cables.
Finally we have the USB type-C port board. In the WH-1000XM4, there was a LED on the USB board, and if we look in the second photo on the right side of the USB port, we can also see a small LED, minus the plastic which normally would cover it. This small plastic piece can be see in the earlier close up photo of the board, to the left of the USB port.
And the two last photos are the 2 feedback microphones.
 |
| Feedback microphone (left side) |
 |
| Feedback microphone (right side) |
With these 2 microphones, we have a total of 9, not 8 as Sony has said. So what is this extra microphone? Well it is located on the left array and I feel this is the actual voice microphone, but who knows.
So that is all of the photos. For my WH-1000XM4 teardown analysis, click here, and the WH-XB910N analysis click here. If anyone notices anything interesting in the teardown photos, so leave a comment below.








The drivers looks really small. Also needs some metal, way too much plastic.
ReplyDeleteThey are much better drivers, much better dynamics and punch, speed and subtlety in high details. THE best headphones I ever heard. Period. Bigger is not necessarily better.
DeleteThe only words that come to mind looking at the internals are "vegan headphones", closeup zoomed photos of the silver version look like it has greenwashed grainy "eco" plastic.
ReplyDeleteEven the bass amount is lower according to early adopters, so i can expect many XM3/XM4 users who are habituated to their sound profile to feel like it's a major downgrade. Lower size driver sounds like a downgrade to the average person too.
It remains to be seen wether ANC is an up or downgrade against low frequency noise, with 4 mics per earcup it should have more self noise(much worse experience in interior environments) so unless they found a much better mic supplier and found a way to combat the problem many mics create(i doubt), it's possible that it is a downgrade.
Another thing to see is latency, XM3 has 210ms(less with AptX), XM4 has 150ms(SBC), if XM5 is worse in this regard then we'll know what sony now thinks of us.
Useless to say pessimism is very strong with this one, but independant tests will clear up the foggy verdict, hopefully.
For such a high price, it'd be nice if they focused on higher audio quality and a slimmer design like the airpods max have.
ReplyDeleteI agree. I wish they would've increase the size of the driver instead of decreasing it and increasing the price. Such a disappointment for XM3 owner.
DeleteIt looks to be like Apple has just focused in having a high price.
DeleteAre ear pads replacable
ReplyDeleteyes
DeleteBased on reviews, the smaller drivers are actually better than the bigger ones. Not sure how they pulled that off.
ReplyDeletewas anyone able to discern if the battery is easy to replace. It's going to come down to what's required to get the cable unplugged desoldered, though I guess if necessary you could cut the cable and re solder/heat shrink. The xm3/4 were trivial to change the battery.
ReplyDeleteAs I mentioned in the post, the battery looks o be connected via a connector (not soldered). Assuming you can get a replacement battery, I am not sure if it comes with the temperature sensor, if it doesn't you will need to remove the old one carefully and reapply later with the new battery.
DeleteIm currently having battery issues that I think is from water damage. Were you able to find what batteries could be used in replacement of this?
ReplyDeleteyour best bet is either ebay or more likely aliexpress/alibaba.
DeleteIf you can also try encompass, but not sure they are available in all countries. Just google encompass sony.
how to teardown sony WH-1000xm5?
ReplyDeleteHi, you need to remove the earpads first. You have to squeeze/press the sides to release the clips.Then you can begin removing the screws on the inside.
DeleteDo you know how the earpiece is connected to the headband? Mine broke and I can't figure out how it was connected, glue or what?
ReplyDeleteSee my post here
Deletehttps://www.reddit.com/r/sony/comments/1065zqz/xm5_earpiece_turns_all_the_way_around/
I feel it is glue or force fit, but not sure. I am trying to save up for a second WH-1000XM5 so I can take it apart for the blog, so I hope to post a full teardown one day.
Drivers do look small, but consider that a larger diaphragm requires more power to move it back and forth so freq response time likely has a sweet spot of power/size ratio. Also consider that diaphragm is right up against ears so its only moving the air across centimeters, so again larger may not necessarily mean better air movement. Just my armchair opinion.
ReplyDeleteRight side of headphoe stoped working any suggestions of what the problem might be?
ReplyDeleteMon chien a mangé le casque, afin de le réparer je cherche les câbles avec le connecteur n°5 sur la photo, où le trouver, quelqu'un a une idée, est ce que la connectique du xm4 est la même?
ReplyDeleteContact Sony support in your local country to ask them where you can buy replacement parts for the headset.
DeleteIs it possible to use these wired, without a battery installed?
ReplyDeleteDo you know how much the electronics component weighted in the end and how much is the plastic frame alone?
ReplyDeletenot my teardown and such information isn't even provided in other teardowns.
DeleteThe underside of the ring has some kind of metal contact with a gap.Below the coil is the speaker with a lot of magnetic field changes. If it is a complete coil, current will be generated when there is a magnetic field change, so there must be a gap.
ReplyDeleteWhat is the dimension of the battery? I'm thinking of getting a replacement/upgrade that I saw on Amazon (754444) that is 3.8V with 2000mah, which should provide 67% more battery life... so in theory max of 50 hours. Its dimension is 44mm x 44mm x 7.5mm
ReplyDeletefrom what I have found, the model number says 723741, so not sure that one you wish to use will fit, since the battery sits in a little tray.
Deletecan you replace the speaker drivers with an OEM 30mm driver thats available in the market? will it work? or should you buy something similar or scrap out the specific piece from an another xm5? I have a problem that maybe the speakers are the reason why its not working on the left side since the touch works but theres no sounds
ReplyDeleteAF=8G / 9G
ReplyDelete90HYC
AB1
Hi, I'm looking for the battery charging ic. I could not find the ic's name. It is damaged due to salt water which comes from doing sport...
wouldn't it just be easier to buy the entire board with the chip and swap that? Assuming the damaged IC is on the usb type c board.
DeleteNo it is easier for me to replace the ic but i dont know which ic it is there are no markings for texas instruments etc..
ReplyDelete