Sony LinkBuds S Teardown by 52Audio
52Audio have released their LinkBuds S teardown, and it does reveal a few things I was not able to show in my earlier teardown post which I made using the FCC documents. I only covered the headset in that teardown, but with the new teardown we have more details and the charging case as well.
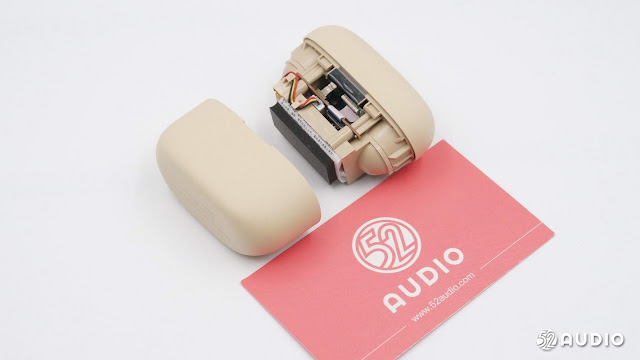
We will start off with the charging case. Opening the case, we can see that is a large foam piece at the bottom protecting the battery. This is absent in the WF-1000XM4 since the battery there is covered by a plastic piece with the wireless charging coil on top of that.
Looking closer, this foam piece is quite thick, but if Sony used a design like the WF-1000XM4, wireless charging could have fit into the case along with the battery. There are wireless earbuds that have wireless charging at this price range, so it is a shame the LinkBuds S lack it.
The battery sits in a small box on the bottom of the headset. There is probably many reasons why Sony decided to go with this setup, rather than copy the WF-1000XM4, but perhaps cost is one and the second could be so the LinkBuds S were not superior in battery capacity compared to the more expensive WF-1000XM4.
Like with previous models from Sony, the battery is provided by Spring Power yet again. The battery is rated at 3.85 V, with a 450mAh/1.732Wh capacity. It is larger than the WF-C500 battery, but smaller than in the WF-1000XM4.
Unlike both the WF-C500 and WF-1000XM4, Sony has opted for two PCBs inside the LinkBuds S case rather than 1. I am not sure why Sony went this route, but I guess space was more limited than in the other 2 models, so 2 boards were necessary.
Here we can see the first board, with the battery connector at the top left, the USB type C port in the bottom left and the pairing button in the bottom right. A ribbon cable connects the 2 boards.
Flipping the main board up, reveals the second board. On the underside of the first board is a the main chip in the case. More on that later.
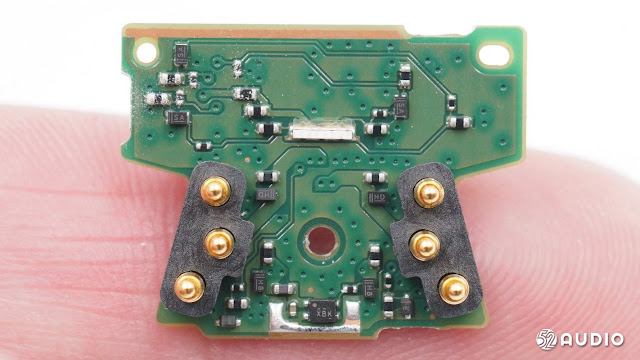
The second PCB has the charging pins and a LED on it. Turning back to the other PCB, we can see 2 important chips, the TI BQ25618 and NXP Semiconductors K32 L2B. For those wanting to see the datasheets, and what the chips are used for, click the links for each chip.
 |
| NXP K32 L2B Series |
 |
| TI BQ25618 |
Next up we have the earbuds themselves.
From the photos, it is difficult to see if there is any glue or tape holding the 2 halves together but the earbuds have an IPX4 rating, so I feel there is something there to prevent any water/dust getting in.
Looking at the antenna assembly, we see 2 contacts, one for the wireless antenna (right) and the touch sensor (left).
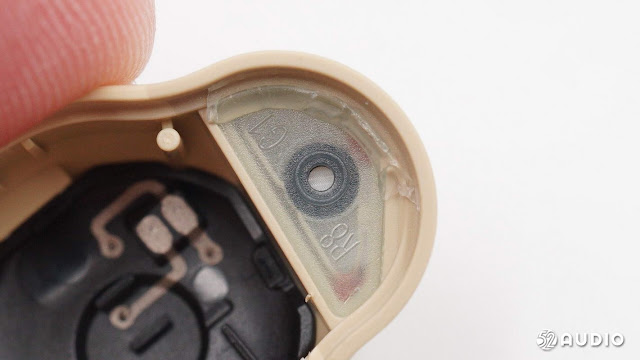
Here we have a closeup of the microphone hole and the mesh that protects it. Perhaps the actual glue/adhesive that was absent in the previous shot can be seen here in this shot. This means taking apart the earbuds apart to replace the battery might impact the IPX4 rating if this glue/seal is not replaced.
Flipping the antenna assembly over, we can see the touch sensor in the middle and the wireless antenna surrounding it. I suspect next year's WF-1000XM5 could follow this design and also integrate the touch sensor into the antenna assembly, to save on internal packaging.
Looking at the other half, we can see a microphone hole, the main board/SiP and the plastic holder for the battery and chip. It is packed with little room to spare, again perhaps indicating the route Sony will take for any future premium earbuds.
There are 2 microphones inside, the top one for voice pickup and for feedforward NC, and the lower microphone for feedback NC. The WF-1000XM4 for comparison has 3 microphones for each earbud, 2 for NC and 1 for voice.
The internal battery is a ZeniPower brand again, the Z52H rated at 3.85V and with a 0.21Wh (54mAh) capacity. Both the new LinkBuds and WF-1000XM4 use ZeniPower batteries, the Z32H and Z55H receptively. There is zero information about these batteries anywhere, and contacting ZeniPower has yielded nothing on my end. I have heard that some WF-1000XM3 models also switched to a ZeniPower battery instead of a Varta one, later on during production.
So while the battery is replaceable, finding a replacement in stores or online may be an issue. If anyone has seen these batteries somewhere for sale online, please leave a link in the comments.
Removing the battery we can see a large ribbon cable with the negative and positive battery contacts. By the microphones we can see the 2 contacts that connect to the driver and on the right under the black tape are the charging pins.
Comparing the production model to the photos from the FCC teardown, there are quite a few differences. First we have full battery contacts here, while the FCC teardown did not show those. Next the small 2 test points in the middle are also very different here versus the FCC photos. For those curious, check the previous post for the photos.
On the underside of the large ribbon cable is the optical proximity sensor.
Here we can see the new driver, unfortunately the teardown does not remove the driver from the device. There are 2 contacts on the left which connect to the ribbon cable in the previous photo. The small hole on the right in the plastic is for the microphone for the feedback noise cancellation.
Here are the two contacts for the wireless antenna and the touch sensor which connect to the antenna assembly.
And finally here is the SiP (System in Package) featuring the Mediatek MT2822M. For more photos of this, see the original FCC teardown post, since in this teardown it is covered by whatever material covers it.
So that is the teardown, it is good to see the battery can be replaced but finding a replacement right now will be rather impossible. With no dedicated microphone for voice, I suspect the earbuds may have some problems eliminating noise from phone calls.


If they use the same chip as XM4 why only LinkBuds are expected to receive low power audio Bluetooth firmware update?
ReplyDeleteThe WH-1000XM5 probably will get the update, along with the LinkBuds. But Sony has not announced anything yet, maybe they are waiting for the full announcement of LE audio.
DeleteCan anyone say if the Varta CP1254 A3 or A4 would work? I know the voltage is lower but in the case of the A4 the total Wh is about the same.
ReplyDeleteIt should work, someone used the same varta in the wf-1000xm4 and they said it worked. My guess is, that the earbuds might not last as long.
DeleteDo you know if the Z55H has the same dimensions then as the Z52H? Now that the Z55H is readily available, if it fits then you can both repair the battery and upgrade it.
DeleteWhile the diameter will probably be the same, I don't expect the height of the batteries to be identical, so the z55H might not fix into the linkbuds S.
DeleteDiameter and height of z52h battery would be nice to have. There are some 3,7V Varta options that might fit.
DeleteMy case's lid has a lot play. Its hard to tell from these photos, but is there a scre or something I can tighten the hinge with?
ReplyDeleteMany users have issues by some sort of cavity reverb-noise from the earbuds. The sound when listening to podcasts or other voices is that you can hear a ping sound in the echo of voices. like some sort of metallic clanging sound. Go to reddit to read more about... alot of people are having these issues. I'm wondering, could the issue be fixed by placing a drop og rubber glue or something that stops the sound being thrown back and forth, and creating this annoying sound.
ReplyDeletecan you link the reddit post? I seemed to have missed it.
DeleteI have gone through a few pairs of the Linkbuds S and I also noticed this weird feedback with voices. Either it was corrected with a firmware update or it only effects some units. I sent mine back for a warranty exchange and the new one did not have the issue.
DeleteI sent back several pairs under warranty, they all seem to have an issue causing them to pop and hiss after several months of use.
it seems the batteries have surfaced : https://www.ebay.com/itm/185868504482
ReplyDeletehopefully a legit listing.
Deletesame battery as WF-SP800N.
ReplyDeleteany links to a WF-SP800N teardown showing this?
DeleteCan I replace the battery myself without desoldering anything? The Z52H is readily available at the market in my region
ReplyDeleteI believe the battery is not soldered. it does looks like there is some kind of tape or adhesive on it.
DeleteIt si not soldered and the tape on batter is only as space seal padding, you can transfer it form old to new battery...
DeleteI bought the battery here: https://www.aliexpress.com/item/1005005567883167.html
ReplyDeleteYou need not separate the IC circuit (on the top) from the plastic compartment, it is possible to uncover it as one piece...
Can I replace the PCB somehow, can I even buy it as a spare part? The problem is that when I connect the first PCB to the second one, it immediately gets hot, the PCB with TI BQ25618 and NXP Semiconductors K32 L2B on it. Especially when I connect the battery charging cables, the PCB with TI BQ25618 and NXP Semiconductors K32 L2B on it starts to get extremely hot, you can't touch it anymore, it gets so hot.
ReplyDeleteHi I have some problems with my LinkBuds S. 1: It does not charge I have not opened it to see the issue and, 2: There is a white noise hissing sound that gets very violent and scratchy when in ambient/noise-cancelling modes I would like some advice on what might be causing this and what I may have to buy yo fix it or at least point me in the right direction please and thank you.
ReplyDeletehave you tried resetting them to factory settings?
DeleteCheck to see if both the contacts on the earbuds and case are clean.
Any idea if wireless charging could be added to the case? Trimming down the foam could give enough give enough space, but not sure where the coils could be attached
ReplyDeleteNo idea, asked that myself, I suspect some kind of controller IC would be required. Ideally, one could try and buy an external usb type c wireless charger and try to integrate that through the usb type c internally but not sure if that would even work.
DeleteI've managed to do it, I've got wireless charging working on the Linkbuds S. Bought a wireless coil with a small PCB, wired it up to 5v and ground on the main PCB and it works. Had to trim the backing of the coil and carefully position the PCB to make sure the wires didn't get caught but it's seamless.
Deletecurious, do you have photos or a video of this process?
DeleteI plan to open them back up and document the process.
Delete