Sony WH-1000XM5 Teardown by 52Audio
We finally have a full teardown of the Sony WH-1000XM5 from 52Audio.com, you can find the full teardown here. While this is not a full dismantling like I want to do in the future, it is better than my FCC teardown analysis. So time to dive in.
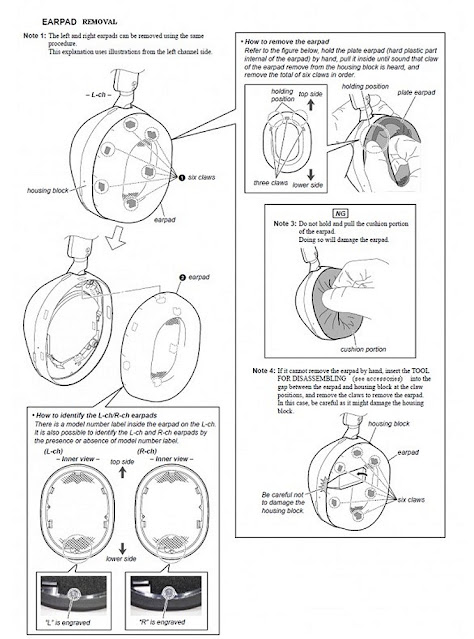
First we remove the earpads using the guide below.
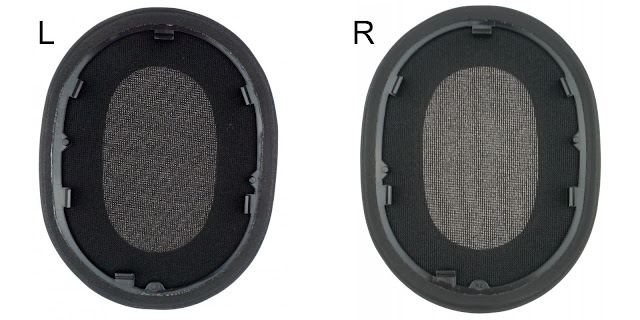
From these photos, we can see the underside of the left and right earpads, they are different and not interchangeable. The reason I mention this is because reddit users have asked if the left and right sides can be interchanged.
 |
| Sony WH-1000XM5 earpads |
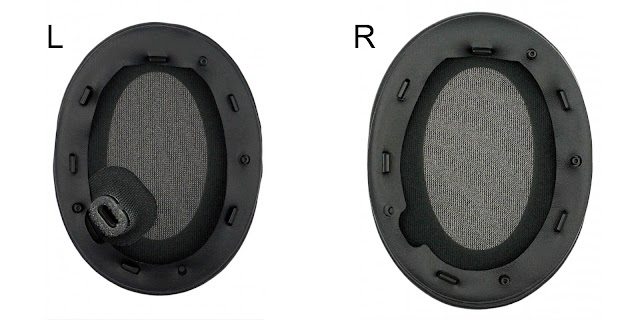
And before people ask, no the WH-1000XM4 earpads will not fit on the WH-1000XM5. Their design is also very different and the left side has the cutout for the ear detection sensor as well. Should Sony have made the earpads identical and interchangeable? Perhaps, but you can buy each side individually (if you can find a local supplier), so I guess this should not be an issue.
 |
| Sony WH-1000XM4 earpads |
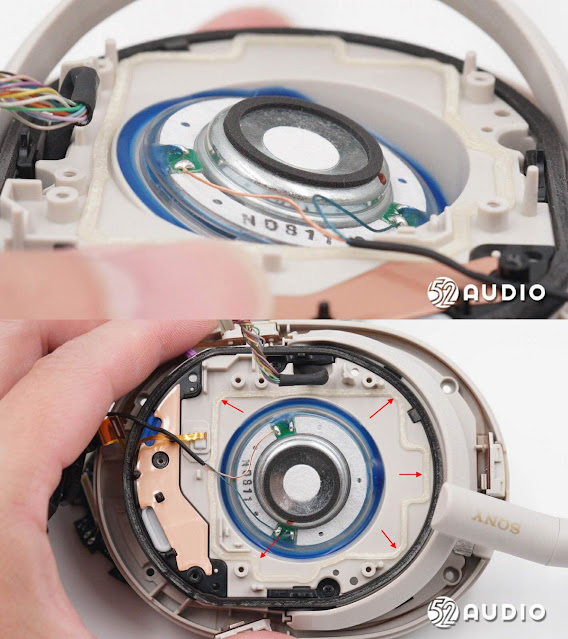
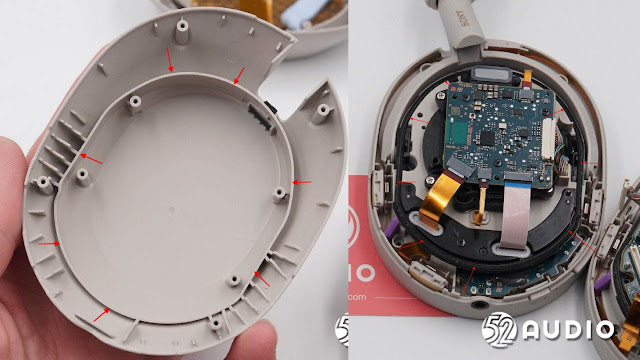
So with the earpads removed, we can see the foam which covers the 30mm drivers. It seems that the foam does not interfere with the wear detection. The red arrows is where the ribs in the earpads line up when you reinstall the ear pads.
Removing the foam, we can see the driver units. The left side has the wear detection, this is an electrostatic sensor versus the optical sensor found in the WH-1000XM4.
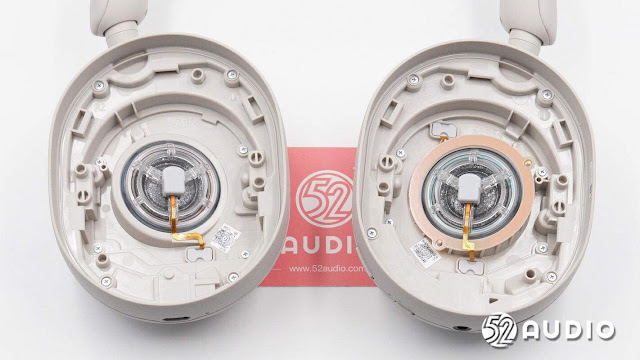 |
| Right side (L), Left side (R) |
We will start off with the right side earcup disassembly.
Here we have a closer look at the feedback NC microphone and its cover. The cover looks to be made out of silicone rubber material. WH-1000XM4 users have reported a loud high pitched noise from one side and removing this cover sometimes fixes that. This noise may be due to moisture build up and damage on the mic and wires. Maybe this new design has fixed this. Remains to be seen.
Here is a comparison of the feedback NC mic between the WH-1000XM5 and WH-1000XM4. The new model uses a MEMS mic versus the electret mic in the WH-1000XM4. In addition, the wires are not exposed like in the older model, but I am unaware if the ribbon cable is coated or not.
 |
| WH-1000XM5 (L), WH-1000XM4 (R) |
With a change from wires to ribbon cable, one thing is certain, replacing the mic will require the replacement of the mic and ribbon cable rather than just the mic, once they are out of warranty. Assuming you can find the ribbon cable and mic assembly for sale.
Removing the screws from the inside near the driver, we can open up the outside cover. Be careful when taking off the cover, as the right side has the touch panel connected by a thin ribbon cable to the board. In years prior when the touch panel could not be disabled via the app, users disconnected the touch sensor cable to disable it.
A closer look at the touch panel ribbon cable connection to the main board.
The battery is user replaceable since it is connected to the main board via a connector and not soldered on.
If you will be attempting any repairs or just opening up the headset, make sure to disconnect the battery before doing anything.
In this shot, we can see the hinge/swivel mechanism/support. Rather than have it on the outside, Sony has moved it into the inside of the earcups.
Looking under the support, we can see a cable. This cable houses the wires from the left side, which connect to the main PCB on the right side. With the cable exposed, this might be the reason why the support is now inside rather than on the outside.
Removing the battery, we can see its specifications. The battery is from Springpower, same brand as the WF-1000XM4 earbuds.
 |
| Click for larger size |
The capacity is higher (1200mAh vs 1100mAh) than in the previous model and is also a higher voltage, 3.8V versus 3.7V. The WH-1000XM4 battery was made by Murata.
As with the WH-1000XM4 battery, there is battery protection PCB along with a temperature sensor. But rather than connect to a separate connector on the PCB, the temperature sensor is now connected to the battery protection PCB in the WH-1000XM5. So this will be something to consider when replacing the battery in the future, since unlike in the WH-1000XM4, the battery will have to come with a temperature sensor.
Underneath the top PCB on the left side, we can see some thermal pads. There were no thermal pads in the WH-1000XM4.
We know the headset supports fast charging (5V/2A or 9V/3A output), so things can probably get warm near the battery when using fast charging. This is probably why we have the thermal pads to dissipate heat.
For those curious about the charging PCB, here is the front and back. The only thing soldered is the main driver wires, all other connections are easily disconnected.
Here we have a closeup of one of the NC mics on the outside. It is a different design than what Sony used in the WH-1000XM4.
With these 2 photos showing the housing and mic.
The mesh covering the microphone is dust proof, but not waterproof, so best not to get these wet.
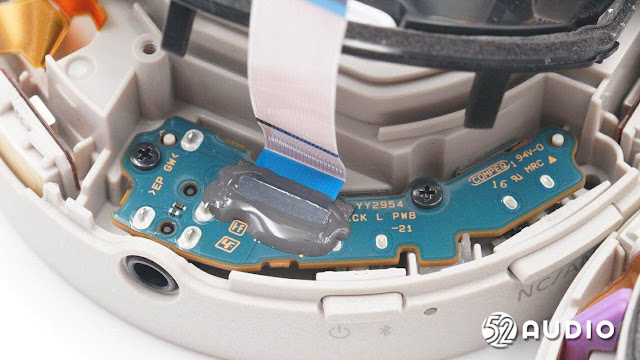
The USB port is on its own separate PCB, just like in the WH-1000XM4.
I find it interesting that this PCB in the WH-1000XM5 has a lot more chips than the WH-1000XM4. According to 52Audio, there is a fuse on the board (chip with #1, by the port), this is missing in the WH-1000XM4. The fuse is a self-healing variety, so when tripped, it will revert back into a functioning fuse.
Another change is that the ribbon cable is glued into the board with some kind of resin or something. Supposedly this is to secure the cable. This glue will make it pretty much impossible to remove the cable. If the USB port breaks, the entire PCB with the cable will need replacing. The other end of the cable is not glued into place, so it can be easily disconnected and this PCB removed.
Removing the battery enclosure, we can see the back of the driver.
The red arrows point out what appears to be (in my mind) hot glue or some kind of rubber seal which prevents moisture and dust ingress and seals the back of the driver unit from the outside. Something similar is present on the WH-1000XM4, but it looks like a rubber O-ring.
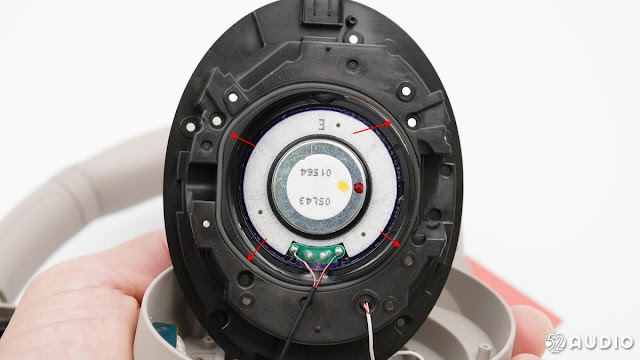 |
| WH-1000XM4 driver - rubber O-ring |
The rear design of the drivers is also different when we compare them. I suspect a larger 40mm driver could have fit into the new model but I guess Sony decided that their new 30mm is just as good as the old 40mm.
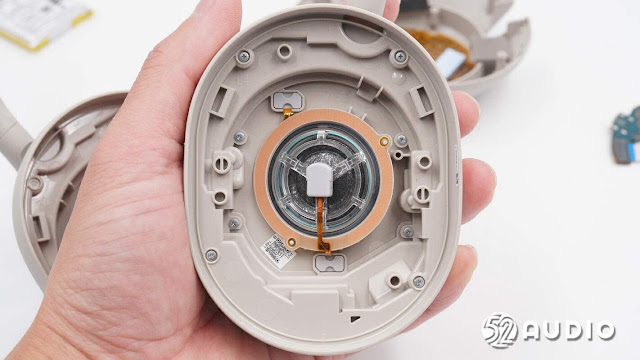
Moving to the left side now, we can see the electrostatic sensor around the driver.
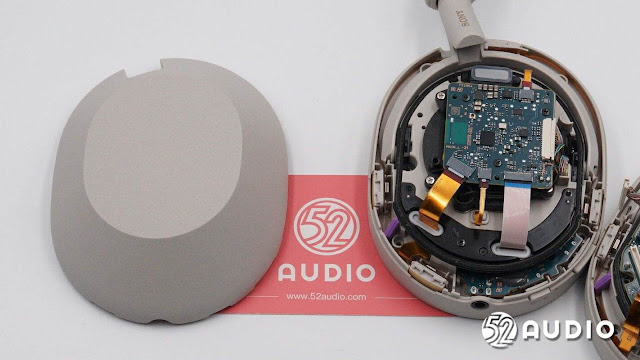
Removing the screws on the inside, we can open up the back. Unlike the right side, there is no touch panel on the left. In the WH-1000XM4, the back of the cover had the NFC PCB.
Comparing the insides between the old and new model, there are many differences in design. It does appear that there is more inside the WH-1000XM5, but that might be because the hing is now inside the cups.
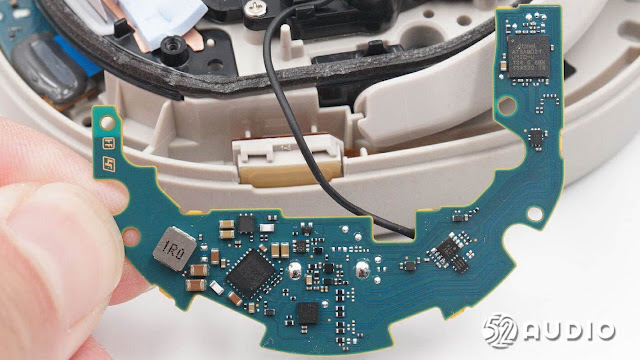
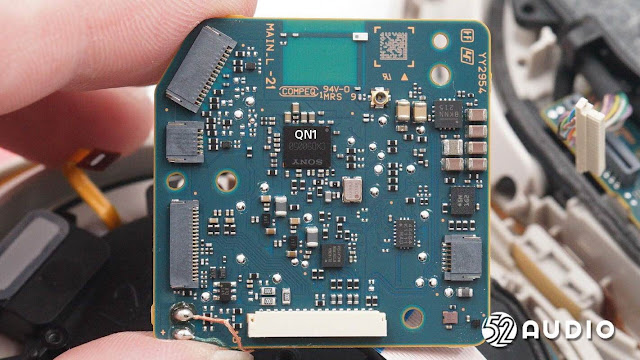
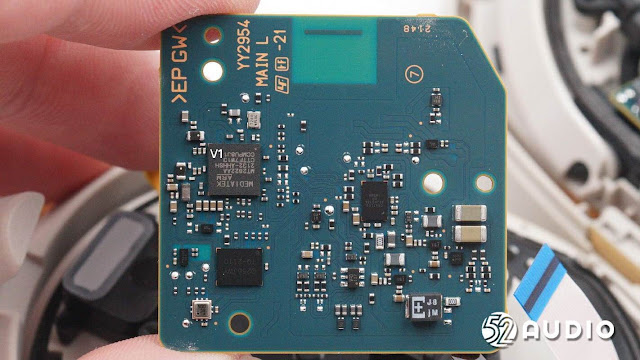
Next up we can see the 2 sides of the main PCB, with the Mediatek MT2822 (V1) and the new QN1 (CXD90050).
For comparison here is the PCB from the WH-1000XM4.
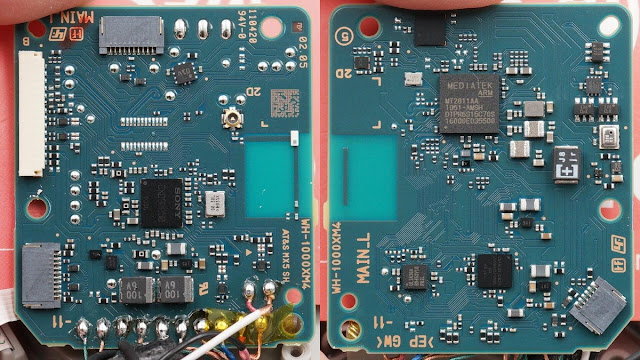 |
| Sony WH-1000XM4 main PCB |
Using the QN1 for reference, I have size up one of the PCB sides, between the WH-1000XM4 and WH-1000XM5. I do hope the size of the QN1 chip did not change in size between the 2 models. Otherwise the comparison is useless.
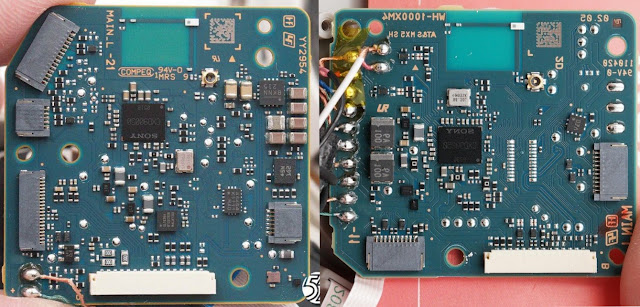 |
| WH-1000XM5 (L), WH-1000XM4 (R) |
The board in the new model is slightly larger and seems to have more components on it. All of the connections, are now only on one side. I suspect this might help with manufacturing.
Trying to lineup the other side will be trickier, since the MT2811 and MT2822 (V2) are not identical in size. See my V3 post for how I came to this conclusion. But long story short, the MT2811 is 4.82mm x 4.82 mm, where as the MT2822 is 5.0mm x 5.0mm. I tried using the Bluetooth antenna as my reference, but it was not working out.
 |
| WH-1000XM5 (L), WH-1000XM4 (R) |
The size is off, but I estimated a similar size between the board as with the first photo comparison.
Here is a close up of the 2 main chips.
We have a few more chips scattered around the boards that play important roles.
- Q256JWY memory chip.
- Air pressure sensor
- Cirrus Logic CS47L63 - low-power audio digital signal processor (DSP)
- BOSCH BMI270 six-axis gyroscope IC
The gyroscope IC is also present on the back of the WF-1000XM5 Bluetooth module, which should be confirmed if we see a full teardown from 52Audio.
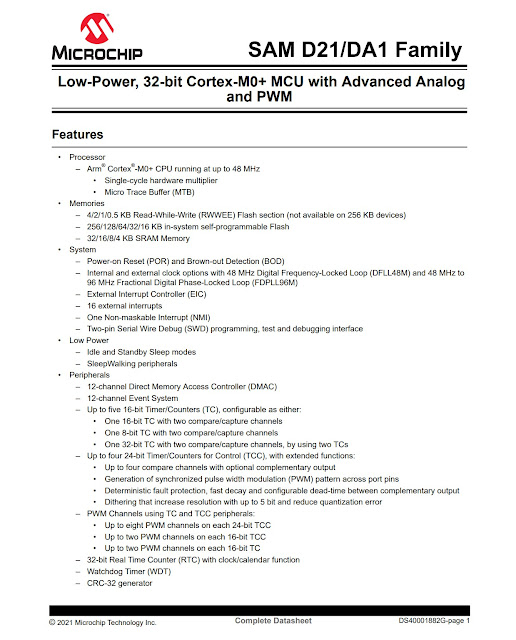
Here is the datasheet for the Cirrus logic chip.
 |
| Cirrus Logic CS47L63 Datasheet |
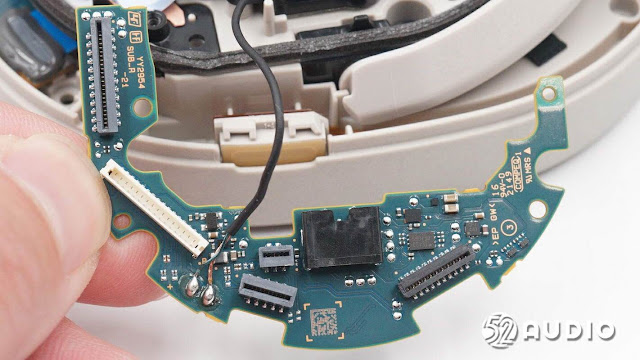
Finally the last component is the second PCB with the 3.5mm jack, button controls and LED.
We have a similar situation where the end of the ribbon cable is glued into the connection with some kind of resin. I am curious why Sony did this on the WH-1000XM5, but not on the WH-1000XM4.
And with that, this concludes the teardown. I would love to do my one teardown one day, more extensive, but still saving up money for a second pair, and also for the WF-1000XM5. It will be a while as the ads from the blog do not bring in much.
You can find the full teardown here at 52Audio, and if you wish to see the WH-1000XM4 teardown, check here.
If anyone notices anything of interest in the teardown that I missed, drop it in the comments.
Amazon - Sony WH-1000XM5











There are benchmark scores of A300s and Zx700s running Android 13 on Geekbench. If true that would be the first time Walkmans receives an Android version upgrade.
ReplyDeletehttps://browser.geekbench.com/v6/cpu/2256539
https://browser.geekbench.com/v6/cpu/2599164
E_D___B_A_N_G_E_R
awesome find.
DeleteJust for curiosity : any idea what might be causing hissing in the XM5? I'd blame the CS47L63 since it's the only audio-related chip that was added but that is just my impression.
ReplyDelete(if you don't see what i'm reffering to, try using the XM5 in wired mode with the unit powered on and ANC disabled, it does it in all circumstances depending on codec and connection status but this combination highlights it on all units i tried it on.)
hmm, good question, I am not an electronics engineer, is the hiss present with wireless and anc on? because if it is in wired form, there is no codec being used.
DeleteYes, after testing i believe there's two hisses on the XM5, one when using it in wired with the unit powered on and another which is always present when the unit is powered on.(both seem to be cumulative)
Deletetype 2 is much higher pitched and harder to discern(ANC somewhat hides it) and the hissing characteristics change when connecting or using LDAC.(in fact it's when first using it in LDAC that i became aware of it)
I wonder what design choices Sony's engineers made to cause these issues to appear, as far as i remember the XM3/4 don't do this.
Perhaps, I don't hear anything on mine, like I did on my WF-C500, maybe I am older and have less sensitive hearing than you.
DeleteSorry to bother you, but do you know the size/type of the eight small screws that hold on the earcup’s back?
ReplyDeleteno.
DeleteOn that left hand side ear cup, which part is the proximity detection sensor that pauses when headphones are removed from ears? My headphones are no longer auto pausing when removed and see comments online where people are suggesting cleaning g the sensor. Thanks
ReplyDeletethe light orange ring that is around the driver.
DeleteBonjour, savez vous ou je peux trouver des pieces détachées, connecteur USB oxydé d'après le SAV et donc refus de garantie.
ReplyDelete