Sony LinkBuds Teardown
The Sony LinkBuds were announced only last month and we already have a teardown by 52Audio. Check their article out for the full teardown which features a lot more detail than I will be posting.
So beginning with the case PCB, we can see Sony has decided to solder on the battery cables like in the WF-C500. While not a major issue, replacing the battery would require more work and tools than in the WF-1000XM4, which has its battery attached to the board with a connector.
There is a connector in the top left, but this is for the extra PCB which signals to the headset to either connect/disconnect to the paired device when the lid is opened/closed. The USB type-C port is not centered on the board since to the left is a reset button.
The other side of the PCB has the main controller chip and the charging pins. The main chip is the K32 L2B microcontroller; more information about it can be found here. Interesting to see the model code printed on the board, YY2953, rather than the model name, WF-L900 like in other models.
Comparing the internal battery, we have a type 621733 lithium ion, with a capacity of 300mAh/1.11Wh. If this battery looks familiar, that is because it is the exact same battery that is found in the WF-C500 charging case. For the rest of the case teardown check the source.
Now moving onto the earbuds themselves, both halves in the driver unit and main body are glued together. As seen below, the black substance does not surround the entire opening, so this is probably not for IPX4 resistance but to hold the pieces together (in addition to glue). There is also no mesh on the holes so best to keep any dirt and water away from them. The little holes do face the ear canal, so it is possible that the hole could get clogged up with dirt and ear wax.
Opening up the main body, we have a ribbon cable connecting the cover to the rest of the unit. So be careful when opening this part so as not to rip/damage the cable.
On the inside we have the battery which is held inside the earbuds with a plastic surround. This is probably to keep the battery in place. Unfortunately the consequence of this is that the battery looks to be smaller than in other models.
 |
| Click for a larger size |
The battery is a Zenipower brand again but a different model, Z32H. The capacity is 3.85V 0.12Wh, which is around 31 mAh. Looking at the other Sony earbuds, the WF-C500 is around 70 mAh and the WF-1000XM4 is around 75 mAh.
In the engineer interview post, I was wondering if the lackluster battery life was because of a smaller battery and it looks like this is the case. The capacity is around 44% of the WF-C500 yet the battery life is about 55%, so I suspect the MT2822 in the LinkBuds is a lot more power efficient than the Airoha AB1562M. Shame Sony did not opt for a slightly larger battery, perhaps 45-50 mAh. I am curious if a larger battery would fit if the plastic surround was removed? Anyone wish to test it out on their earbuds?
Now moving onto the ring driver. While we have seen photos of the driver in the Sony Engineer interview post, it was only shown outside of the earbuds, but now we can see it in situ. The black membrane which produces the sound can be seen in the middle. 52Audio measured the driver to be around 13mm.
Taking the driver out of the body we can see how the driver connects to the main body, via 2 small pins, (Correction) the driver is soldered to the main board. Therefore any repairs/replacements of the ring driver would require a soldering iron to remove the driver.
We can actually see where the 2 small pins connect on the main body in the next photo.
Looking at the inside of the detached cover, we can see one of the PCBs with the positive terminal for the battery. The black plastic piece holds the battery in place and connects to the main body which allows for a secure fit of the cover.
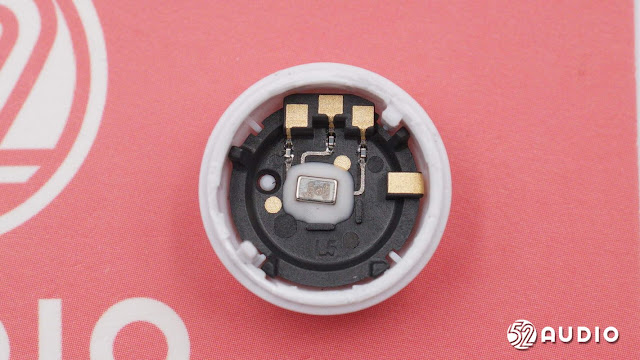
After removing the PCB, we can finally see the call microphone and the plastic piece with the Bluetooth antenna. The microphone does appear to be affixed with what looks to be a lot of glue.
While looking at the antenna assembly I noticed it was very different to the one shown in the engineer interview. It looks like the assembly is attached to the plastic cover with glue.
 |
| Top: 52Audio teardown; bottom: Sony Engineer Interview |
Comparing the 2 sets of photos. the antenna looks to be the same design with a C shape, but the main plastic piece looks a bit different on the edges. The biggest noticeable change is on the underside with the microphone and board contacts. In the engineer interview post, I even said the PCB contacts did not match up with the contacts on the antenna, but it seems they do on the actual production model. Likewise the microphone looks like it has a lot less glue in the bottom photo. I would guess that the engineer interview part was possibly an engineering prototype or pre-production model.
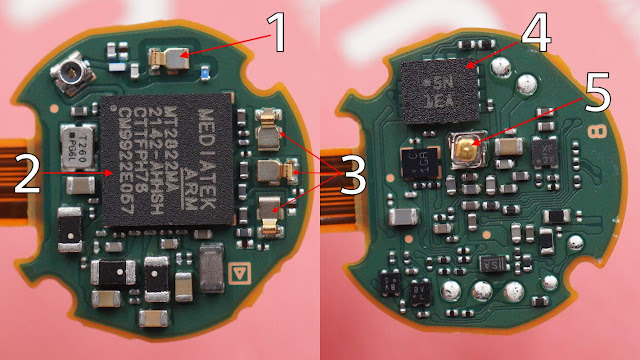
Now moving to the PCBs. There are 2 connected by a ribbon cable. We have already seen one side with the positive battery terminal, and here they are all in relation to each other.
To save on battery and space, a lot functionality has been ported to the main Bluetooth chip, the MT2822. But there are still other chips like a battery protection chip and an accelerometer present on the boards.
The main body PCB has the following parts:
1. Proximity sensor
2. On board contacts for driver assembly
3. Charging pins
4. Negative contact for battery
5. Battery protection chip
The other PCB has the following parts:
1. On board contact for Bluetooth antenna
2. Bluetooth SoC - Mediatek MT2822
3. On board contacts for microphone
4. Accelerometer chip
5. Positive contact for battery
Finally a close up of the main Bluetooth SoC, the Mediatek MT2822MA. This seems like it is another variant again, the other being the MT2822SA in the WF-1000XM4. Perhaps this version of the MT822 in the LinkBuds is without the built in DAC/AMP, but this is only a speculation on my end.
But I will write more about this in an update in the Sony V1 post.
Well that is the overview of the teardown, the rest of the photos and details can be found here in the original article from 52Audio. Some interesting surprises, like the smaller battery, a new variant of the MT2822 and the ring driver assembly. While it would have been cool to see the ring driver taken apart, I suspect 52Audio did want to keep their LinkBuds in working order.
If anyone sees anything else interesting in the teardown, leave a comment below. Apologies for any spelling and grammatical mistakes.


love this post, thank you
ReplyDeleteFantastic teardown. Any clue on a maximum size for a battery? Did you happen to measure the size of the existing battery and/or plastic holder? Totally interested in tryna throw in a larger battery.
ReplyDeleteI wonder if there are other batteries that can fit or are compatible with this. I can't find any replacement batteries with that model. My got burnt out by the firmware update.
ReplyDeleteHow do you suggest closing back the headphones in order to get a secure fit for the connectors, the 2 pins on the main driver? I'm hesitant to use glue or anything.
ReplyDeleteMine were having issues and after taking them apart, it seems like this is the problem.
ideally a glue that can move, see my wf-1000xm4 battery replacement guide, the glue to stick them back together would also work for the linkbuds s.
Deletehttps://thewalkmanblog.blogspot.com/2022/12/how-to-replace-battery-on-sony-wf.html
Hi, can anyone advise on how to get the battery out? I've got the cover off but the battery won't budge. I've broken the top of a razor off so it's not from lack of trying :) pls help, thanks
DeleteIs it difficult to replace the battery? My buds got battery drain after the software update
ReplyDeleteAny suggestions on how to get the battery out, it's seems to be properly glued in there. I've even broke a razor trying to wedge it out. Pls help :)
ReplyDeletethe battery is not stuck to anything else than the glue around it, wich takes up so much room that perhaps a bigger battery fits. stick a knife between the case and the glue. do it around and then gauge the battery out and lift it from on of the sides.
Deletebtw. to open the case, biting it with your back teeth breaks open the glue. or use a vise or grips or whatever. a knife does not work to split open the bud without ruining the surface.
I've tried many ways, but I can't open to change the batteries :(
ReplyDeleteWork the glue on the side of the battery all the way around with a very small flat screwdriver. Eventually you will be able to pop the battery out.
DeleteAnyone actually wanting to repair these needs to go to the original teardown in the article. The author here says the driver isn't soldered even though it is and is noted in the article using google translate. Huge miss here that can make people over confident they can just pull it out as I tried to. Mine was already damaged prior to attempting it so no new damage done but really just makes this feel like a lazy translation of the existing work.
ReplyDeleteI have corrected the error. I am not a repair blog, nor do I claim to be one. It takes a good amount of time to make these posts, and I will make mistakes, but I try my best.
DeleteWell done with the quick correction and reply I appreciate that. I'll admit I'm very biased towards repair knowledge. Sorry for any harshness there I was mostly frustrated in the moment.
DeleteI cannot see the pictures in the 52Audio post, is it published/archived anywhere else?
ReplyDeletethis link doesn't work for you? https://www.52audio.com/archives/112638.html
DeleteIf so, perhaps some geoblocking?
Is there anyone try to upgrade the batterie to z52h or z55h, Please I really need to know if its work and can set as replacement
ReplyDeletething is, we don't have dimensions of the battery and if it would fit. if it is the same, then should work, but there is a new model coming, although delayed now. see this post (disregard the wrong url name)
Deletehttps://thewalkmanblog.blogspot.com/2024/08/sony-linkbuds-s-yy2964-delayed.html
Thanks for your reply,
Deletei will buy two sizes of the battery, z32h and z52 and i will check if it have the same dimensions, i dont have any plan to upgrade the earpuds at the moment so i will go on and i will let you know the results
Much appreciated. Would love to see a battery life comparison of if batteries will fit. Please do keep me updated.
Deleteany updates?
DeleteIt would be so much better if the battery was turned 90º, perhaps a thicker battery and the buds placed either side of it so that the case could be a bit wider and longer but much thinner.
ReplyDeleteDear Admin, how do you manage to open up the main body to access to the battery without any damage or whatsoever? I used heat gun, IPA, the thinnest razor blade I could find, but still to no avail. I am this close of prying it open with my pliers.
ReplyDeletesee here
Deletehttps://www.ifixit.com/Guide/Sony+Linkbuds+(WF-L900)+Battery+Replacement/178661